![[Unity] Match 3 퍼즐 만들어보기](https://img1.daumcdn.net/thumb/R750x0/?scode=mtistory2&fname=https%3A%2F%2Fblog.kakaocdn.net%2Fdna%2FbLX0Cr%2FbtsooKflfSz%2FAAAAAAAAAAAAAAAAAAAAAG859YvT2sk_6-xwqKNglvH43BqYkdeL58jnwHOQow8G%2Fimg.gif%3Fcredential%3DyqXZFxpELC7KVnFOS48ylbz2pIh7yKj8%26expires%3D1767193199%26allow_ip%3D%26allow_referer%3D%26signature%3Drzo4h%252BolOcIVYt6vSTmtikvBjRg%253D)

1주 조금 넘게 쓰리 매치 퍼즐을 제작해봤다.
안해본 장르를 만들어보고 싶어서 FPS와 퍼즐중에 고민하다가 퍼즐을 선택했다.
물리가 하나도 들어가지않은 배열을 한없이 다룰수있는 퍼즐이 조금 더 해보고싶었다.
예전에 퍼즐을 살짝 만들어보려던 나에게 강사님이 꽤 어려울거라고 말했던 기억이 있는데..
그때 당시에 했으면 훨씬 더 힘들었을거 같다.
아래에 깃허브 주소에 있는 코드를 참고해서 제작했다.
내 코드보다 깔끔하게 잘 구현해두셨으니 코드가 궁금하신 분들은 이 깃허브 주소를 참고하셔도 좋을것같다.
https://github.com/daltonbr/Match3
GitHub - daltonbr/Match3: ✨🐠The most original game on Earth: Match3 - now in Unity!✨🐟
✨🐠The most original game on Earth: Match3 - now in Unity!✨🐟 - GitHub - daltonbr/Match3: ✨🐠The most original game on Earth: Match3 - now in Unity!✨🐟
github.com
화면 구성

배경은 어떤 핸드폰으로 실행하더라도 레터박스가 생기지않게 큰 사이즈의 이미지를 넣어주었다.
초록색 네모는 그냥 퍼즐판을 예쁘게 꾸며줄 외곽선이다.

그리고 한번 생성하면 바꿀일이없는 정적인 이미지를 넣어줄 캔버스와,
수시로 퍼즐이 떨어지고 애니메이션이 재생되는 동적인 캔버스 2개로 나눠서 진행을 했다.
화면의 최상단에 이미지나 UI를 배치시키면, 노치나 펀치홀에 가려질 수 있기때문에 SafeArea를 적용시켰다.
https://dev-junwoo.tistory.com/124
유니티 노치, 펀치홀 디자인 대응하기
게임을 만들다보면 생각해야할 부분이 상당히 많은데, UI와 화면구성, 화면비같은 시각적인 부분도 상당히 중요한 요소들이다. 요즘 스마트폰들의 화면비를 보면 다들 화려한 개성들을 뽐내기
dev-junwoo.tistory.com
퍼즐판 크기 , 퍼즐 배경 생성

PuzzleMaker라는 클래스를 만들고, 인스펙터로 테마,퍼즐판의 크기(x,y), 간격 등 여러가지 세팅을 입력하게 해주었다.
👀 [PuzzleColor 코드]
public enum PuzzleColor
{
    Blue, Green, Red, Purple, None
}
게임 테마는 퍼즐 컬러라는 Enum변수이다.
👀 [퍼즐판 외곽선 세팅 코드]
//퍼즐 배경 프리펩에서 사이즈 가져오기
puzzleSize = puzzleBackPrefab.GetComponent<RectTransform>().sizeDelta;

//게임테마와 사이즈로 퍼즐판 외곽선 크기와 스프라이트 설정
puzzleBackFrame.sizeDelta = puzzleFrame.sizeDelta = new Vector2((puzzleSize.x * x) + puzzleSpacing, (puzzleSize.y * y) + puzzleSpacing);
puzzleBackFrame.GetComponent<Image>().sprite = frameSprs[(int)gameTheme];
나같은 경우는 퍼즐배경과 퍼즐의 위치를 맞추기 위해 캔버스 2개에 프레임이 1개씩 총 2개가 있었다.
👀 [퍼즐 배경 세팅 코드]
        //퍼즐 배경 생성
        for (int i = 0; i < x; i++)
        {
            for (int j = 0; j < y; j++)
            {
                Instantiate(puzzleBackPrefab, puzzleBackFrame.transform).GetComponent<PuzzleBackGround>().Init(GetPos(i, j), puzzleBackSprs[(int)gameTheme]);
            }
        }
그리고 퍼즐 배경도 게임 테마의 색에 맞춰서 생성해주었다.
이미지들 위치 맞추기
위에 배경을 만드는 코드를 보면 GetPos(int x,int y) 라는 함수가 나온다.
👀 [퍼즐 좌표에 맞는 위치 리턴 함수]
    public Vector2 GetPos(int x, int y)
    {
        return new Vector2(x * puzzleSize.x + puzzleSpacing / 2, -y * puzzleSize.y - puzzleSpacing / 2);
    }
바로 이 함수인데, 그냥 좌표(위치)에 퍼즐 사이즈를 곱해주고 간격만큼 계산해주는게 끝이다.
하지만 이 함수를 사용하기 위해선 통일 시켜야할것이 있다.
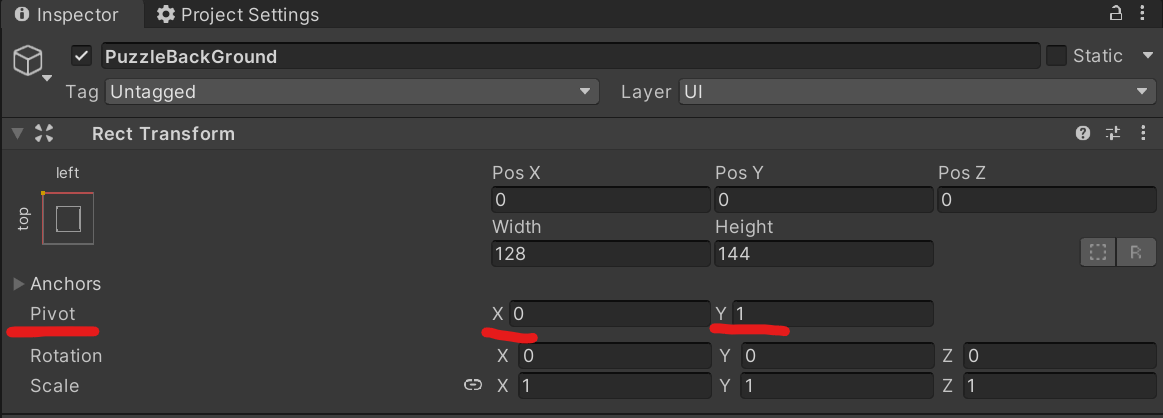

퍼즐 배경과 퍼즐의 프리펩에 있는 RectTrasform인데, 앵커와 피벗을 좌측 상단으로 설정해주고 진행을 해야한다.
그러면 제일 왼쪽 상단의 AnchoredPosition의 값이 0,0이 되기때문에 계산하기 수월했다.
그리고 아까 제일 처음 세팅해둔 Frame(외곽선)을 부모로 지정하고 생성해주면 알맞은 위치로 가게된다.

나같은경우는 퍼즐 배경과 퍼즐의 이미지 크기가 같아서 저렇게 해도 되지만,
만약에 퍼즐의 사이즈가 다르다면

이런식으로 Image의 부모를 위와 같이 맞춰주고 아래 이미지를 중앙으로 설정해버려도 된다.
좌표값의 통일
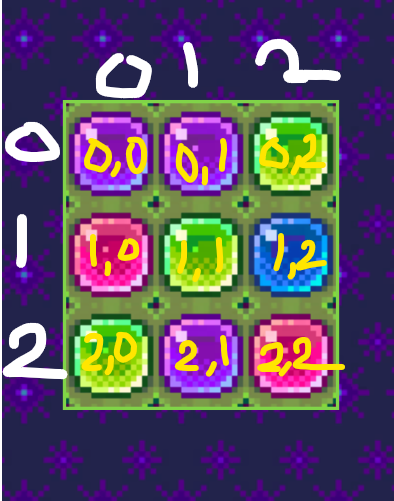
위 퍼즐의 구성을 2차원 배열로 봤을때, x가 세로(열)고 y가 가로(행)다.
하지만 유니티의 좌표를 이용하다보면 x로 좌우를 이동시키고, y로 상하를 이동시키기 때문에 혼동이 온다.
그래서 나는 위 사진과 다르게 x를 가로(행), y를 (세로) 로 사용하기로 했다.

위와 같이 좌표값을 규정하고 작업을 시작했다.
프로그램 내부에서 돌아가는 2차원 배열의 모습은 우리가 화면에 보는 모습과 다르겠지만,
각 퍼즐에 x,y값을 내가 규정한대로 지정하고, 화면에 띄워주고, 그렇게 검사만 하면 된다.
위에서 설명한 GetPos함수도 그렇게 맞춰져있다.
퍼즐의 이동과 채우기

이 부분을 위에 소개한 깃허브를 보며 많이 참고했는데,
처음에 보고서는 한칸 내리고 검사하고 한칸 내리고 검사하고 하는게 비효율적으로 느껴져서 밑으로 쭉 내리면 되지않나?
라고 생각했는데..
쭉 내리니 바로 아래칸과 옆칸의 특수한 퍼즐들을(장애물같은) 판별할수없고,
점차적으로 내려가는 느낌이 아니라 쫙 펼쳐지는 느낌이라서 이상했다.
과정은 아래에서 2번째 칸부터 검사시작 => 내릴수있으면 내리기 => 다끝나고 맨 윗칸에 퍼즐이 없으면 채우기
이 순서로 진행된다.
👀 [퍼즐 아래로 내리는 코드]
public bool FillRoutine()
{
    bool isBlockMove = false;

    for (int j = Y - 2; j >= 0; j--)
    {
        for (int i = 0; i < X; i++) //아래에서 부터 위로 훑고 올라감
        {

            if (puzzles[i, j] == null || !puzzles[i, j].IsMoveable()) continue;

            Puzzle curPuzzle = puzzles[i, j];
            Puzzle belowPuzzle = puzzles[i, j + 1];

            if (belowPuzzle == null) //무언가 없다면 그냥 내림
            {
                PuzzleChange(curPuzzle, i, j + 1);
                isBlockMove = true;
            }
        }
    }
}
만약 장애물이 없다면 이런식으로 하단을 검사하고 내려버리면 된다.
👀 [퍼즐 이동 코드]
    public void Move(int x, int y, float fillTime, UnityAction callback)
    {
        if (coMove != null)
        {
            StopCoroutine(coMove);
        }

        coMove = StartCoroutine(MoveCoroutine(x, y, fillTime, callback));
    }


    IEnumerator MoveCoroutine(int x, int y, float fillTime,UnityAction callback = null)
    {
        float curtime = 0.0f;
        Vector2 startPos = myPuzzle.myRect.anchoredPosition;
        Vector2 targetPos = manager.Maker.GetPos(x, y);

        while (curtime < fillTime)
        {
            curtime += Time.deltaTime;
            myPuzzle.myRect.anchoredPosition = Vector2.Lerp(startPos, targetPos, curtime / fillTime);

            yield return null;
        }

        myPuzzle.SetPos(targetPos);

        callback?.Invoke();
    }
퍼즐 이동은 Lerp를 이용해 구현했다.
혹시모를 콜백까지 구현해두었다.
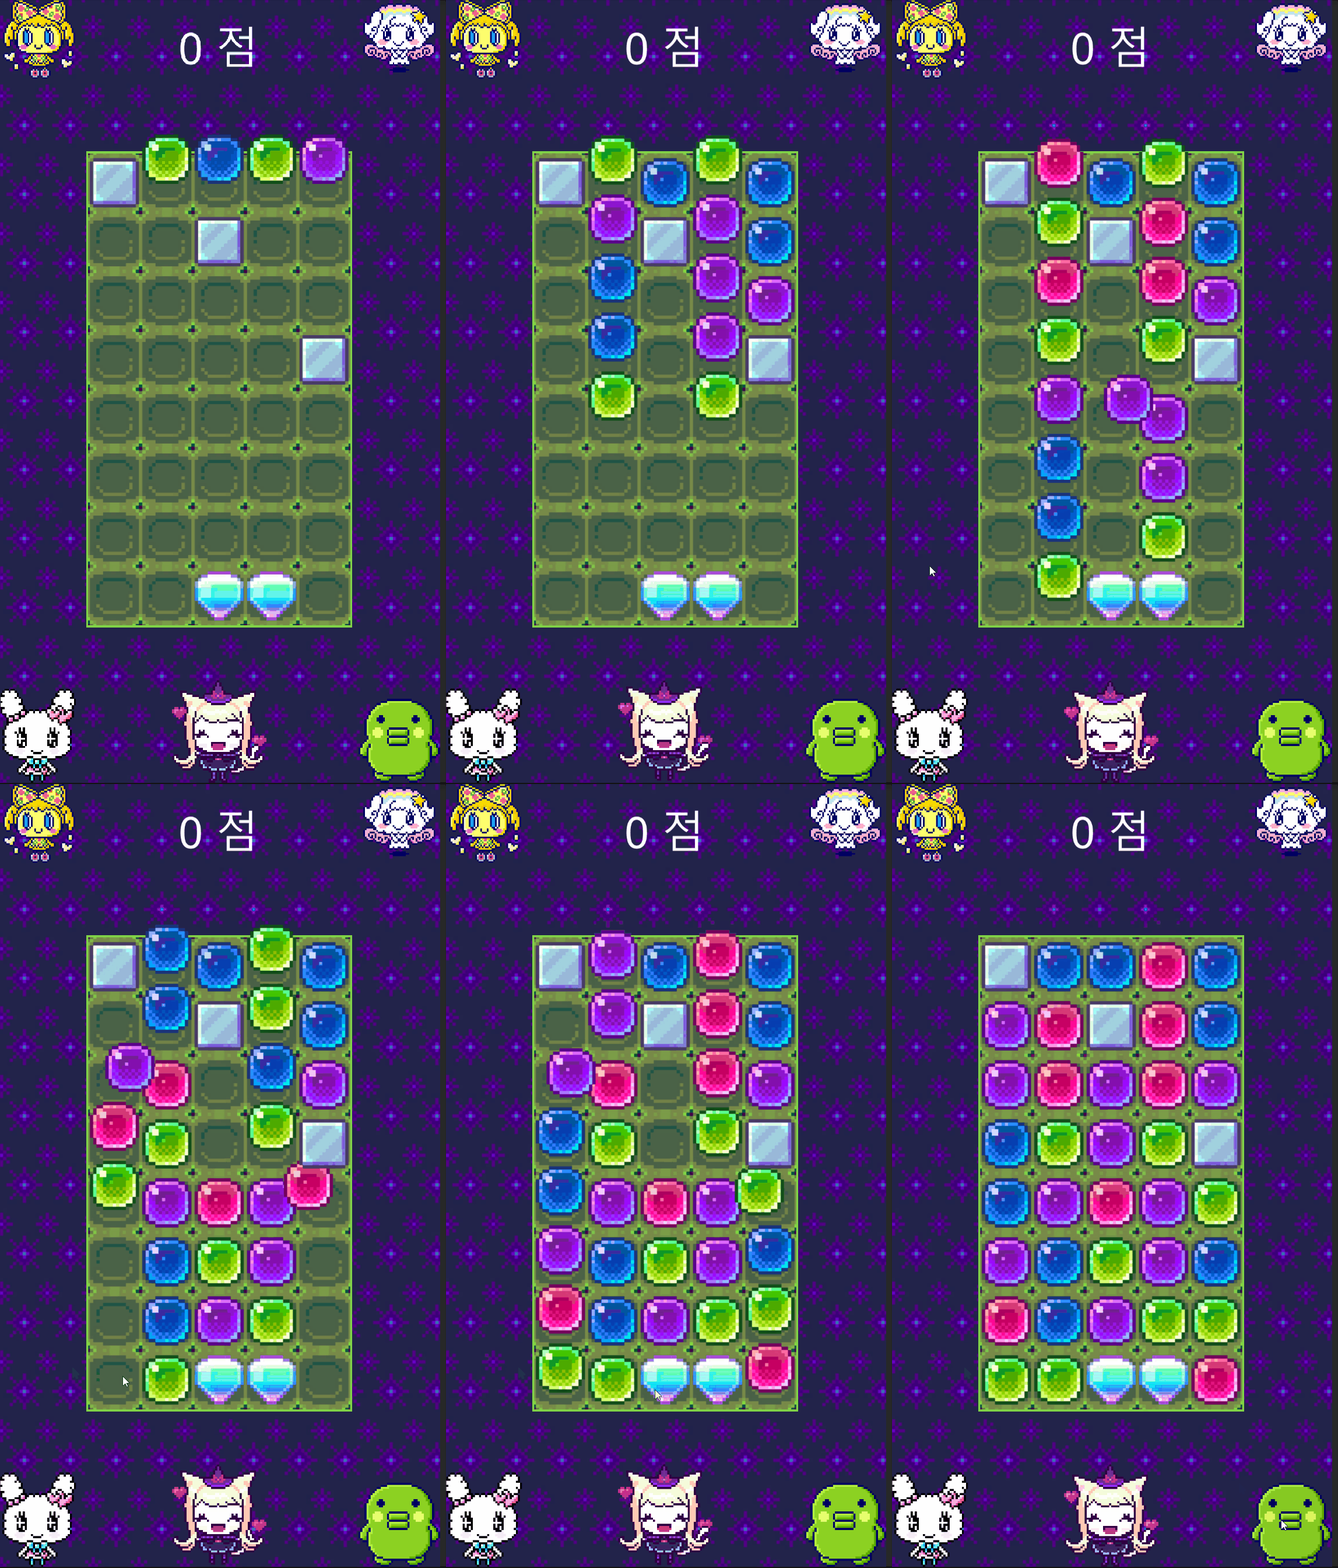
하지만 이런식으로 장애물이 존재한다면 대각선도 검사를 해줘야한다.
👀 [퍼즐 내리는 코드(대각선 포함)]
    public bool FillRoutine()
    {
        bool isBlockMove = false;

        for (int j = Y - 2; j >= 0; j--)
        {
            for (int i = 0; i < X; i++) //아래에서 부터 위로 훑고 올라감
            {

                if (puzzles[i, j] == null || !puzzles[i, j].IsMoveable()) continue;

                Puzzle curPuzzle = puzzles[i, j];
                Puzzle belowPuzzle = puzzles[i, j + 1];

                if (belowPuzzle == null) //무언가 없다면 그냥 내림
                {
                    PuzzleChange(curPuzzle, i, j + 1);
                    isBlockMove = true;
                }
                else
                {

					//옆이 장애물이라면 대각선 좌우 하단 탐색
                    if (CheckIsObstacle(i - 1, j) || CheckIsObstacle(i + 1, j))
                    {
                        for (int diag = -1; diag <= 1; diag += 2)
                        {
                            if (i + diag < 0 || i + diag >= X) continue;

                            Puzzle newDiagPuzzle = puzzles[i + diag, j + 1];

                            if (newDiagPuzzle == null)
                            {
                                PuzzleChange(curPuzzle, i + diag, j + 1);
                                isBlockMove = true;

                                break;
                            }
                        }
                    }
                }
            }
        }

        return isBlockMove;
    }
원래는 하단이 장애물일때로 검사를 했었는데, 하단을 검사하다보니 바로 옆 라인에서 쭉 내려갈 수 있는 상황임에도 불구하고 아래에 장애물이있는 퍼즐이 먼저 대각선으로 이동해버려서 이상해서 옆을 검사하는것으로 바꿨다.
이 코드로 구현을하면 장애물이 연속해서 3개가 있을때 가운데가 안채워 지는 부분이있다.
하지만 이부분은 캔디크러쉬 사가만 봐도 장애물이 없어져야 채워지는 맵의 기믹들이 있기때문에 그부분을 생각해서 남겨두었다.
어떻게 게임을 기획하느냐에 따라 달라질 것 같다.
👀 [최상단 퍼즐 생성 코드]
        //최상단 퍼즐 생성해줌
        for (int i = 0; i < X; i++)
        {
            if (puzzles[i, 0] == null)
            {
                Puzzle newPuzzle = Maker.MakeNewPuzzle(i, -1, PuzzleType.Normal);

                newPuzzle.SetCoordinate(i, 0);
                newPuzzle.Move(0.1f);

                isBlockMove = true;
            }
        }
그리고 마지막으로 최상단을 검색해서 없으면 채워주면 끝이다.
코드들을 보면 퍼즐이 움직였을때 isBlockMove 변수를 true로 바꿔주고 마지막에 리턴시킨다.
이 코드를 실행시키는 코루틴을 보자.
👀 [위 코드들이 실행되는 코루틴]
 IEnumerator FillCor()
    {

        isProcess = true;
        bool needFill = true;

        while (needFill)
        {
            while (FillRoutine())
            {
                //내려오는 시간 0.1초 기다려줘야함
                yield return new WaitForSeconds(0.1f);
            }

            yield return CheckPuzzleCo((isNeedFill) =>
            {
                needFill = isNeedFill;
            });

        }

        isProcess = false;
        fillco = null;
    }
이런식으로 블록이 움직이면 두번째 while문에서 빠져나오지 않고 계속 채운다.
그리고 하나의 블록도 이동되지 않았을때(false가 리턴되었을때), 터트릴 퍼즐이 있는지 체크한다.
마지막 CheckPuzzleCo라는 코루틴은 코루틴으로 값을 리턴받고 싶어서 콜백을 이용해 위와 같이 람다식으로 코드를 작성했다.
https://dev-junwoo.tistory.com/140
[Unity]코루틴으로 값을 리턴 받고 싶을 때
간혹 개발하다보면 코루틴을 사용하지만 어떠한 결과를 리턴 받고 싶을 때가 있다. 그럴때는 매개변수에 Action을 넣고 람다식을 사용해주면 된다. IEnumerator Start() { yield return ReturnCoroutine((flag) => {
dev-junwoo.tistory.com
퍼즐 검사 및 아이템 생성
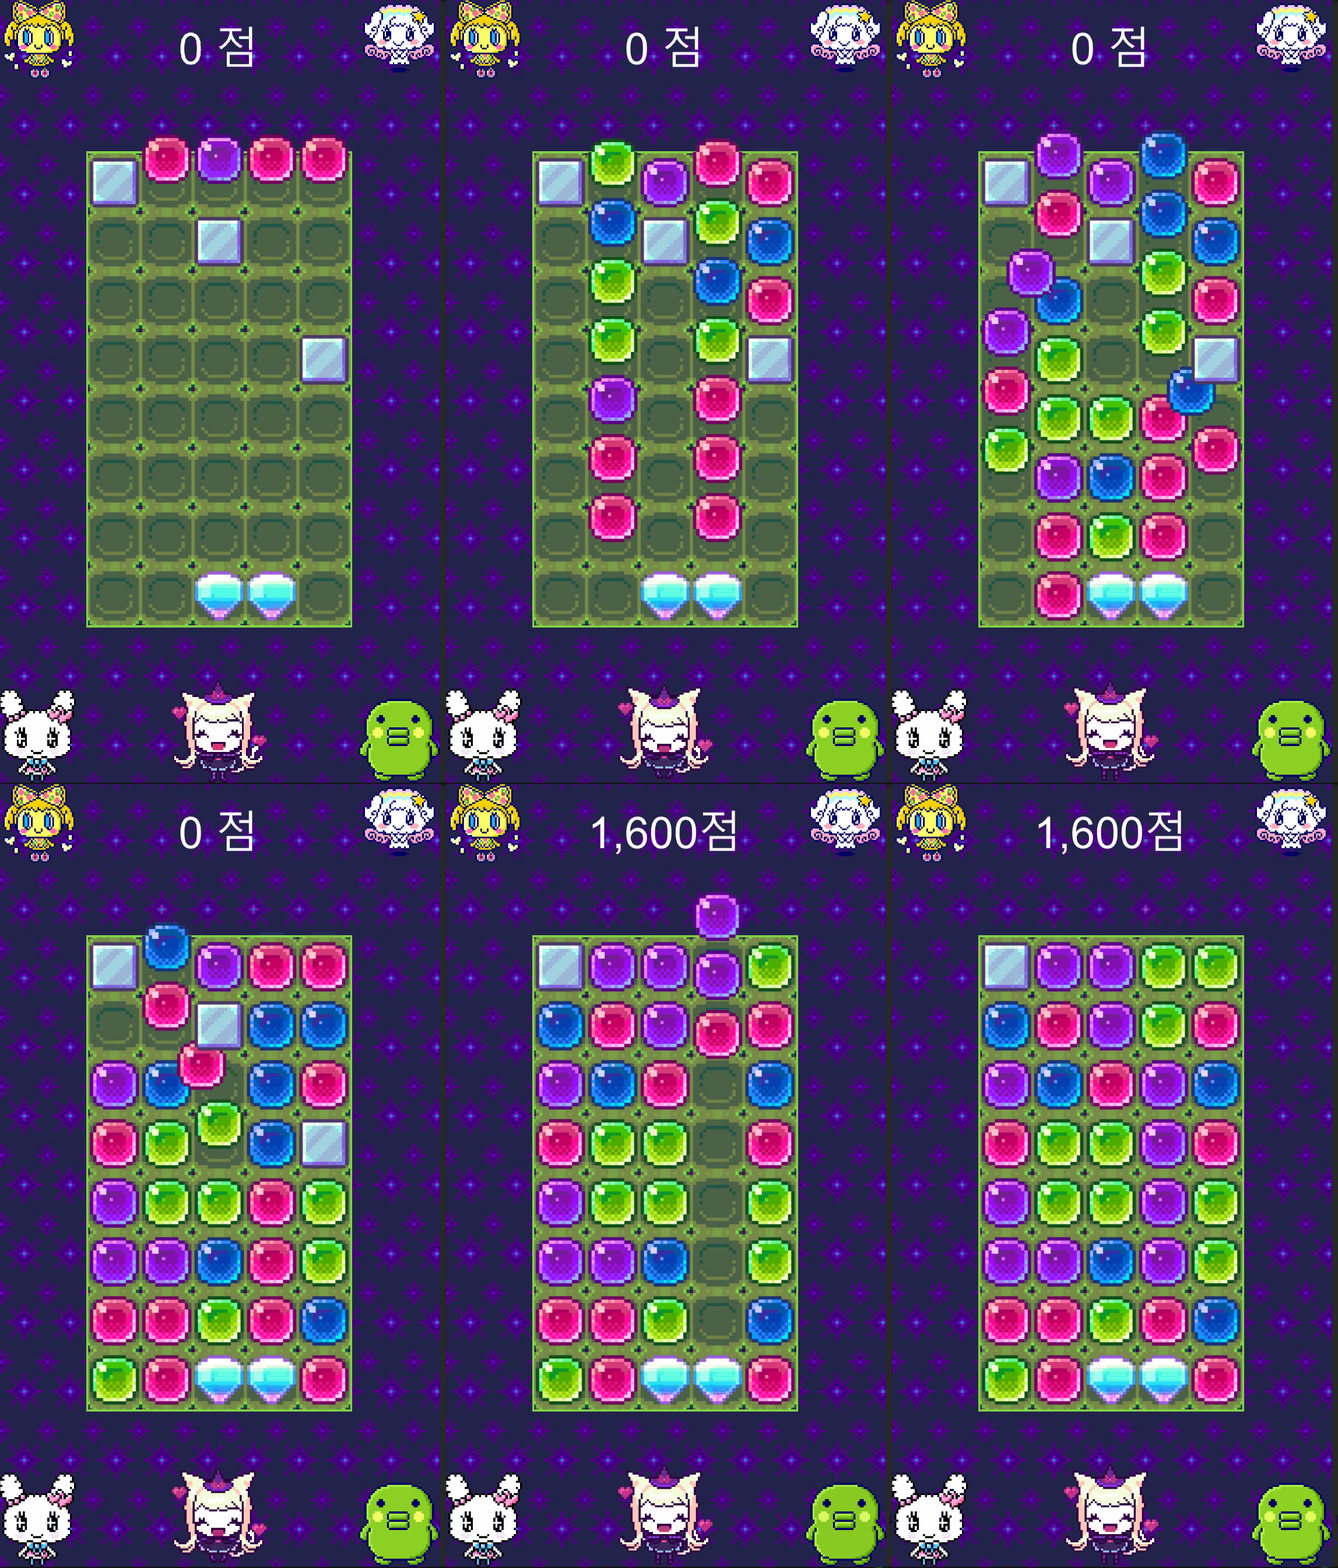
3매치의 핵심 부분일것 같다.
나는 코테를 준비하며 익힌 BFS를 활용했다.
처음엔 가로세로만 딱 검사해서 터트리면 된다고 쉽게 생각했었다.
하지만 다음과 같은 상황을 보자

우리가 직접 터치를 해서 터트릴 경우에 이런 상황은 나오지 않는다.
왜냐하면 다 터지고 나서 매치되는걸 찾아야 하기 때문에 저중에 몇개는 다른색일것이다.
하지만 여러개가 한번에 터져서 랜덤으로 퍼즐들이 쏟아져 내려오고 탐색을할때는 저런 상황이 나온다.
기존 BFS처럼 인접한 색깔을 탐색해서 딱 거기까지만 다 터트리면 정말 쉬운데..
빨간색 네모는 터트리고 노란색 체크표시는 살려줘야 한다.
그래서 조금 변형해서 검사를 했다.
👀 [퍼즐 3매치 탐색 코드]
//시계방향으로 검사 배열
private int[] dx = new int[] { 0, 1, 0, -1 };
private int[] dy = new int[] { -1, 0, 1, 0 };


bool isDestroyBlock = false;

List<Puzzle> itemPuzzles = new List<Puzzle>();
List<Puzzle> destroyPuzzles = new List<Puzzle>();
Queue<Puzzle> searchQueue = new Queue<Puzzle>();

for (int j = 0; j < Y; j++)
{
    for (int i = 0; i < X; i++)
    {

        if (puzzles[i, j] == null || puzzles[i, j].color == PuzzleColor.None) continue;

        HashSet<Puzzle> visitPuzzles = new HashSet<Puzzle>();
        searchQueue.Enqueue(puzzles[i, j]);
        visitPuzzles.Add(puzzles[i, j]);

        PuzzleType rewardType = PuzzleType.Empty;

        while (searchQueue.Count != 0)
        {
            Puzzle curPuzzle = searchQueue.Dequeue();

            List<List<Puzzle>> findPuzzles = new List<List<Puzzle>>();

            List<Puzzle> up = new List<Puzzle>();
            List<Puzzle> right = new List<Puzzle>();
            List<Puzzle> down = new List<Puzzle>();
            List<Puzzle> left = new List<Puzzle>();

            findPuzzles.Add(up);
            findPuzzles.Add(right);
            findPuzzles.Add(down);
            findPuzzles.Add(left);

            //현재 퍼즐에서 상하좌우 탐색
            for (int k = 0; k < 4; k++)
            {
                int newX = curPuzzle.X + dx[k];
                int newY = curPuzzle.Y + dy[k];

                do
                {
                    Puzzle newPuzzle = GetPuzzle(newX, newY);

                    if (newPuzzle == null || curPuzzle.color != newPuzzle.color) break;

                    //방문하지 않은 퍼즐이라면 큐에 넣어줌
                    if (visitPuzzles.Add(newPuzzle))
                    {
                        searchQueue.Enqueue(newPuzzle);
                    }

                    if (!itemPuzzles.Contains(newPuzzle) || !destroyPuzzles.Contains(newPuzzle))
                        findPuzzles[k].Add(newPuzzle);


                    newX += dx[k];
                    newY += dy[k];

                } while (true);
            }
        }
    }
}
퍼즐의 수만큼 반복하면서 체크한다.
널이거나 색이 없는 타입의 퍼즐이면 continue를 시켜주었다.
SearchQueue에 현재 퍼즐을 담아주고, visitPuzzles라는 HashSet 변수를 만들어서 중복검사를 편하게 했다.
visitPuzzles가 없으면, 돌아다니면서 인접한 같은색을 다 넣을거기때문에 while문이 끝나지 않을것이다.
상하 좌우를 do-while문을 이용하여 탐색해서 같은색이면 list에 담아주었다.
이제 상하좌우를 통해 찾은 같은색깔의 퍼즐조합으로 아이템을 지급할지와 터트릴지를 체크한다.
👀 [퍼즐 3매치 탐색 코드(아이템)]
  if ((findPuzzles[0].Count + findPuzzles[1].Count + findPuzzles[2].Count + findPuzzles[3].Count) < 2) continue;

                    //레인보우 되는지 체크(5개)
                    if (rewardType != PuzzleType.Rainbow &&
                        ((findPuzzles[0].Count + findPuzzles[2].Count >= 4) || (findPuzzles[1].Count + findPuzzles[3].Count >= 4)))
                    {
                        itemPuzzles.Clear();
                        itemPuzzles.Add(curPuzzle);
                        rewardType = PuzzleType.Rainbow;

                        if (findPuzzles[0].Count + findPuzzles[2].Count >= 4)
                        {
                            itemPuzzles.AddRange(findPuzzles[0]);
                            itemPuzzles.AddRange(findPuzzles[2]);
                        }

                        if (findPuzzles[1].Count + findPuzzles[3].Count >= 4)
                        {
                            itemPuzzles.AddRange(findPuzzles[1]);
                            itemPuzzles.AddRange(findPuzzles[3]);
                        }
                    }
                    // L자 되는지 체크(폭탄)
                    else if ((rewardType == PuzzleType.Empty || (int)rewardType < 4)
                        && ((findPuzzles[0].Count >= 2 || findPuzzles[2].Count >= 2) && (findPuzzles[1].Count >= 2 || findPuzzles[3].Count >= 2))) //L자
                    {

                        itemPuzzles.Clear();
                        rewardType = PuzzleType.Bomb;
                        itemPuzzles.Add(curPuzzle);

                        for (int bombindex = 0; bombindex < 4; bombindex++)
                        {
                            if (findPuzzles[bombindex].Count >= 2)
                            {
                                itemPuzzles.AddRange(findPuzzles[bombindex]);
                            }
                        }


                    }
                    //4개 되는지 체크
                    else if ((rewardType == PuzzleType.Empty || (int)rewardType < 2)
                        && ((findPuzzles[0].Count + findPuzzles[2].Count >= 3) || (findPuzzles[1].Count + findPuzzles[3].Count >= 3)))
                    {

                        itemPuzzles.Clear();
                        itemPuzzles.Add(curPuzzle);

                        if ((findPuzzles[0].Count + findPuzzles[2].Count >= 3))
                        {
                            rewardType = PuzzleType.Vertical;
                            itemPuzzles.AddRange(findPuzzles[0]);
                            itemPuzzles.AddRange(findPuzzles[2]);
                        }
                        else if (findPuzzles[1].Count + findPuzzles[3].Count >= 3)
                        {
                            rewardType = PuzzleType.Horizontal;
                            itemPuzzles.AddRange(findPuzzles[1]);
                            itemPuzzles.AddRange(findPuzzles[3]);

                        }

                    }
                    //다 안되면 터지긴 하는지 체크
                    else
                    {

                        if (findPuzzles[0].Count + findPuzzles[2].Count >= 2)
                        {
                            if (!destroyPuzzles.Contains(curPuzzle))
                                destroyPuzzles.Add(curPuzzle);

                            destroyPuzzles.AddRange(findPuzzles[0]);
                            destroyPuzzles.AddRange(findPuzzles[2]);
                        }

                        if (findPuzzles[1].Count + findPuzzles[3].Count >= 2)
                        {
                            if (!destroyPuzzles.Contains(curPuzzle))
                                destroyPuzzles.Add(curPuzzle);

                            destroyPuzzles.AddRange(findPuzzles[1]);
                            destroyPuzzles.AddRange(findPuzzles[3]);
                        }
                    }
일단 상하좌우의 모든 퍼즐을 다 합쳐서 2개가 안되면 터질것이 없기때문에 continue시킨다.
(큐에 퍼즐이 남았다면 상하좌우 탐색)
이제 아이템을 지급하고 터트릴지를 판단하는데, while문이 시작하기전에 선언한 rewardType 이 변수로 보상을 판단한다.

퍼즐은 총 6가지가 있다.
그중에서 아이템으로 지급되는건 4가지인데,
다이아 - 5개 이상 연결
폭탄 - L자 연결
가로,세로 - 4개 이상 연결
우선순위도 순서대로 이다.

다시 이 사진을 가져와서 아이템을 지급할때는 조합당 1개만 지급해야한다.
저 빨간 네모칸이 한 조합이고 , 만약 좌측상단이 보라색이였다면 L자도 되고 4개 이상의 조합도 됐을것이다.
이럴때는 L자 - 폭탄만 지급한다.

다이아 생성 코드를 보면, reward타입을 검사하는 이유가 위에 설명한 이유이다.
이미 최고 조합을 갖추고 있으니 굳이 다른 조합은 검사하지 않아도 된다.
5개 조합 => 위아래 합해서 4개 이상 or 왼쪽오른쪽 합해서 4개이상
L자 조합 => 위,아래 중 하나는 2개 이상 And 왼쪽 오른쪽 중 하나는 2개 이상
4개 조합 => 위아래 합해서 3개 이상 or 왼쪽오른쪽 합해서 3개이상
3개 조합 => 위아래 합해서 2개 이상 or 왼쪽오른쪽 합해서 2개이상
연출을 위해 itemPuzzles와 destroyPuzzles를 나눠 두었다.

이미 최고 조합을 가졌을때는 맨 마지막 else문에 들어와서 터질게 있으면 destroypuzzles리스트에 넣어주면 끝이다.
이제 한 조합의 bfs를 다 돌고 끝났다.
줄 아이템이 있다면 생성하고, 터트릴게 있다면 터트리면 된다.
👀 [매치퍼즐 터트리기, 아이템 지급 코드]
if (destroyPuzzles.Count >= 1)
{

    isDestroyBlock = true;

    if (rewardType != PuzzleType.Empty)
    {
        Puzzle itemPuzzle = Maker.MakeNewPuzzle(itemPuzzles[0].X, itemPuzzles[0].Y, rewardType, itemPuzzles[0].color);

        Action<bool, UnityEngine.Events.UnityAction> action = null;

        foreach (Puzzle puzzle in itemPuzzles)
        {
            if (puzzle != null && puzzle != itemPuzzle)
            {
                if (puzzle.X != itemPuzzle.X || puzzle.Y != itemPuzzle.Y)
                {
                    SetPuzzle(puzzle.X, puzzle.Y, null);
                }

                if (puzzle.type == PuzzleType.Normal)
                    puzzle.Move(itemPuzzle.X, itemPuzzle.Y, 0.1f, () => puzzle.Pop(true));
                else
                    action += puzzle.Pop;
            }
        }

        action?.Invoke(false, null);

        PopRoutine(destroyPuzzles);

        SetPuzzle(itemPuzzle.X, itemPuzzle.Y, itemPuzzle);
        itemPuzzles.Clear();
    }
    else
    {
        PopRoutine(destroyPuzzles);
    }

    destroyPuzzles.Clear();

}
일단 터트릴 퍼즐이 있다면 isDestroyBlock 값을 true로 바꿔주었다.
rewardType이 있다면, 맞는 퍼즐을 생성하고 그 아이템으로 퍼즐조합이 합쳐지는듯한 연출을 했다.
그리고 콜백으로 파괴시키게 해놨다.
하지만 조합중에 아이템이 있다면, 그냥 그 아이템의 효과를 사용하게 해놨다.

Swap 과 아이템 사용

위치를 바꿔서 매치되는게 없으면 되돌리고, 맞으면 터트려주고 채워주는게 전부다.
👀 [퍼즐 터치하는 코드]
  //퍼즐 눌렀을때
    public void OnPointerDown(PointerEventData eventData)
    {
        if (manager.isProcess) return;

        manager.SelectPuzzle = myPuzzle;
        manager.isClick = true;
    }

    //터치 뗐을때
    public void OnPointerUp(PointerEventData eventData)
    {
        manager.isClick = false;
    }

    //누른상태로 퍼즐에 터치 들어왔을때
    public void OnPointerEnter(PointerEventData eventData)
    {

        if (manager.isProcess == true || manager.isClick == false || manager.SelectPuzzle == this || manager.SelectPuzzle == null) return;

        manager.SwapPuzzle(this.myPuzzle);

    }
무언가 process중이라면 터치가 되지않고,
아니라면 manager의 SelectPuzzle에 누른 퍼즐을 참조해주었다.
첫번째 누른 퍼즐이 아닌, 두번째 swap 당하는 퍼즐에서 manager의 SwapPuzzle함수를 실행해주었다.
👀 [Swap 코드]
//퍼즐 스왑
    public void SwapPuzzle(Puzzle swapPuzzle)
    {
        //당한쪽에서 호출하는거임. 즉 swapPuzzle이 눌럿던 퍼즐임
        isClick = false;

        int newX = selectPuzzle.X;
        int newY = selectPuzzle.Y;

        if ((newX == swapPuzzle.X && (newY == swapPuzzle.Y - 1 || newY == swapPuzzle.Y + 1))
            || (newY == swapPuzzle.Y && (newX == swapPuzzle.X - 1 || newX == swapPuzzle.X + 1)))
        {
            CheckHintTime(false);
            StartCoroutine(SwapPuzzleCor(newX, newY, swapPuzzle));
        }
    }
바로 옆에 붙어있는 퍼즐인지 검사하고 맞으면 코루틴을 실행시켜 줬다.
👀 [Swap 코루틴]
    IEnumerator SwapPuzzleCor(int newX, int newY, Puzzle swapPuzzle)
    {
        //당한쪽에서 호출하는거임. 즉 swapPuzzle이 눌럿던 퍼즐임
        isProcess = true;
        soundManager.PlayEffect(0);
        selectPuzzle.SetAndMove(swapPuzzle.X, swapPuzzle.Y);
        swapPuzzle.SetAndMove(newX, newY);


        if (selectPuzzle.CheckItemCombination(swapPuzzle))
        {
             yield return new WaitForSeconds(0.1f);
             Fill();
        }
        else
        {
            StartCoroutine(CheckPuzzleCo((isNeedFill) =>
            {
                //콜백
                if (isNeedFill)
                {
                    Fill();
                }
                else
                {
                    CheckHintTime(true);
                    soundManager.PlayEffect(0);
                    swapPuzzle.SetAndMove(selectPuzzle.X, selectPuzzle.Y);
                    selectPuzzle.SetAndMove(newX, newY);
                    isProcess = false;
                    selectPuzzle = null;
                }

            }));

        }

        yield return null;

    }
2개의 퍼즐 위치를 바꿔주고 퍼즐 배열을 바꿔준다.
그리고 2개의 아이템 조합을 검사한다.
아이템 조합이 있다면 그 아이템 조합의 효과를 실행시키고, 아니라면 터질게 있는지 검사해준다.
👀 [아이템조합 체크 함수]
public override bool CheckItemCombination(Puzzle swapPuzzle)
{

    if (swapPuzzle.isRainbowType)
    {
        swapPuzzle.Pop(true);
        this.SpecialPop(PuzzleType.Rainbow);
    }
    else if (swapPuzzle.isBombType)
    {
        swapPuzzle.Pop(true);
        this.SpecialPop(PuzzleType.Bomb);
    }
    else
    {
        this.Pop();
    }

    return true;

}
이 함수는 Puzzle이라는 클래스를 상속받은 특수 퍼즐들(다이아,폭탄 등)에서 재정의 해서 사용했다.
위 코드는 폭탄의 조합 확인 함수다.


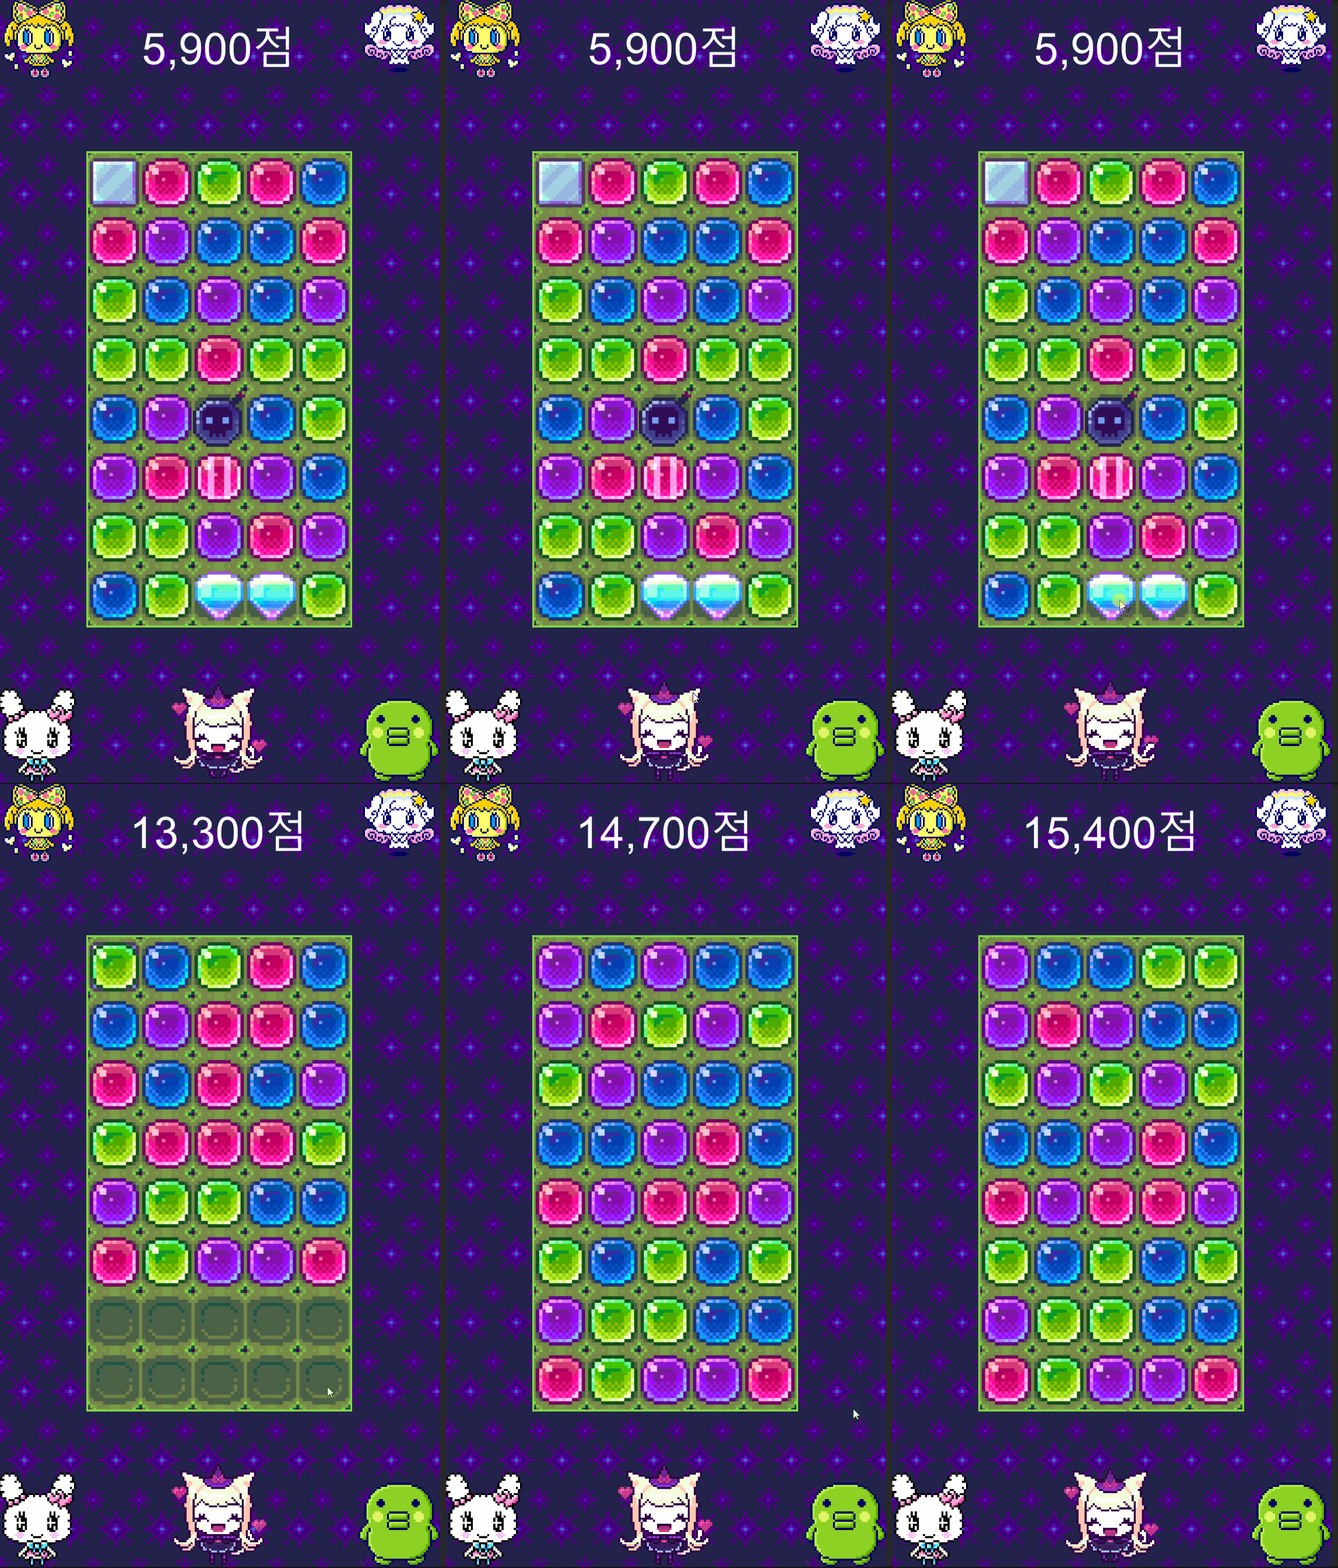
조합 힌트 주기

다른 퍼즐게임들을 해보면 일정 시간 맞추지 못했을때 조합힌트를 주는 기능이 있다.
이 기능이 좋은 이유는 유저 편의도 있지만, 조합이 없을때 퍼즐을 다시 생성할수도 있기 때문이다.
힌트는 5개 -> L자 -> 4개 -> 3개 순서대로 힌트를 줬다.
👀 [힌트 시간 체크 함수]
 //일정시간동안 입력없을시 힌트주는 시간 체크
    public void CheckHintTime(bool isCheck)
    {
        if (coHintTimeCheck != null)
        {
            StopCoroutine(coHintTimeCheck);
        }

        FlickerPuzzles(false);

        if (isCheck)
        {
            coHintTimeCheck = StartCoroutine(CheckHintTimeCoroutine());
        }
    }

    IEnumerator CheckHintTimeCoroutine()
    {
        float time = 0.0f;

        while (time < hintTime)
        {
            time += Time.deltaTime;

            yield return null;
        }

        yield return FindMatchablePuzzle();
    }
위 함수는 코드는 시간체크 코루틴이 돌고 있으면 종료하고 , 힌트를 주고있다면 그것도 종료하고 다시 힌트 체크 코루틴을 시작한다.
아래 코루틴은 설정해둔 시간이 지나면 조합을 찾아서 알려준다.
👀 [매치되는 퍼즐 찾는 코루틴]
   //매치할수있는 퍼즐 찾기
    IEnumerator FindMatchablePuzzle()
    {
        // 5개 -> L자 -> 4개 -> 3개 순. 없으면 다 뿌수고 리필.

        try
        {
            if (FindMatch(5) || FindMatchL() || FindMatch(4) || FindMatch(3))
            {
                FlickerPuzzles(true);
                yield break;
            }

            for (int j = 0; j < Y; j++)
            {
                for (int i = 0; i < X; i++)
                {
                    if (puzzles[i, j] != null)
                    {
                        puzzles[i, j].Pop();
                    }
                }
            }

            Fill();
        }
        catch
        {
            yield break;
        }

        yield return null;

    }
조합이 있다면 알려주고, 없다면 퍼즐을 다 없애버리고 다시 채운다.
조합 5 /4 /3 개 찾기
👀 [5,4,3 조합 찾는 함수]
 //5,4,3 모양 탐색
    public bool FindMatch(int MatchCount)
    {

        for (int j = 0; j < Y; j++)
        {
            for (int i = 0; i < X; i++)
            {
                List<Puzzle> findPuzzle = new List<Puzzle>();
                Puzzle curPuzzle = puzzles[i, j];

                if (curPuzzle == null || curPuzzle.color == PuzzleColor.None) continue;

                if (!IsOutOfIndex(i + MatchCount - 1, j))
                {
                    for (int k = 1; k < MatchCount; k++)
                    {
                        findPuzzle.Add(GetPuzzle(i + k, j));
                    }

                    if (findPuzzle.FindAll(x => x.color == curPuzzle.color).Count == MatchCount - 2)
                    {
                        Puzzle anotherPuzzle = findPuzzle.Find(x => x.color != curPuzzle.color);
                        findPuzzle.Remove(anotherPuzzle);

                        for (int h = 0; h < 2; h++)
                        {
                            if (FindSameColor(anotherPuzzle, 1, curPuzzle.color, h == 0 ? Dir.Up : Dir.Down) != null)
                            {
                                hintPuzzles.Add(curPuzzle);
                                hintPuzzles.Add(FindSameColor(anotherPuzzle, 1, curPuzzle.color, h == 0 ? Dir.Up : Dir.Down));
                                hintPuzzles.AddRange(findPuzzle);
                                return true;
                            }
                        }

                        if (MatchCount == 3 && anotherPuzzle.X == curPuzzle.X + 2)
                        {
                            if (FindSameColor(anotherPuzzle, 1, curPuzzle.color, Dir.Right) != null)
                            {
                                hintPuzzles.Add(curPuzzle);
                                hintPuzzles.Add(FindSameColor(anotherPuzzle, 1, curPuzzle.color, Dir.Right));
                                hintPuzzles.AddRange(findPuzzle);
                                return true;
                            }

                        }
                    }
                }

                findPuzzle.Clear();

                if (!IsOutOfIndex(i, j + MatchCount - 1))
                {
                    for (int k = 1; k < MatchCount; k++)
                    {
                        findPuzzle.Add(GetPuzzle(i, j + k));
                    }

                    if (findPuzzle.FindAll(x => x.color == curPuzzle.color).Count == MatchCount - 2)
                    {
                        Puzzle anotherPuzzle = findPuzzle.Find(x => x.color != curPuzzle.color);
                        findPuzzle.Remove(anotherPuzzle);


                        for (int h = 0; h < 2; h++)
                        {
                            if (FindSameColor(anotherPuzzle, 1, curPuzzle.color, h == 0 ? Dir.Right : Dir.Left) != null)
                            {
                                hintPuzzles.Add(curPuzzle);
                                hintPuzzles.Add(FindSameColor(anotherPuzzle, 1, curPuzzle.color, h == 0 ? Dir.Right : Dir.Left));
                                hintPuzzles.AddRange(findPuzzle);
                                return true;
                            }
                        }

                        if (MatchCount == 3 && anotherPuzzle.Y == curPuzzle.Y + 2)
                        {
                            if (FindSameColor(anotherPuzzle, 1, curPuzzle.color, Dir.Down) != null)
                            {
                                hintPuzzles.Add(curPuzzle);
                                hintPuzzles.Add(FindSameColor(anotherPuzzle, 1, curPuzzle.color, Dir.Down));
                                hintPuzzles.AddRange(findPuzzle);
                                return true;
                            }

                        }
                    }
                }
            }
        }


        return false;
    }
퍼즐의 좌측 상단퍼즐에서부터 퍼즐의 오른쪽, 아래만 탐색하면서 반복했다.
만약 5개 이상의 조합을 찾는다고 가정했을때,
배열 인덱스를 벗어나지 않는다면 자신을 제외한 4개의 퍼즐이 들어올것이고, 그중에 단 1개만 다른색이여야 한다.
그리고 그 다른색의 위아래, 혹은 좌우를 살펴서 같은 색이 있다면 그 퍼즐을 포함해서 알려주면 된다.

체크 표시가 현재 검사를 시작하는 퍼즐이라고 생각한다면, 이런 모양이 나올수있다.
자기 오른쪽으로 퍼즐3개가 정상적으로 존재하며, 다른 퍼즐(초록색)의 위아래중 한개만 파란색이여도 true이다.
3개 이상으로 검사할 필요가 없는게, 첫번째 케이스의 맨오른쪽에 파란색 하나가 더 있다면 5개에서 true를 리턴했을 것이고, 2번째 케이스에서 맨오른쪽에 파란색이 하나 더 있었다면 3개가 연결됐기 때문에 터졌을것이다.

이 케이스를 아래로 바꿔봐도 똑같다.
왼쪽과 상단을 검사할 필요가 없는건 다른 퍼즐에서 이미 오른쪽 아래로 검사가 된 퍼즐이기 때문이다.
그러므로 오른쪽과 하단만 검사를 해주었다.
하지만 3개는 예외가 있다.
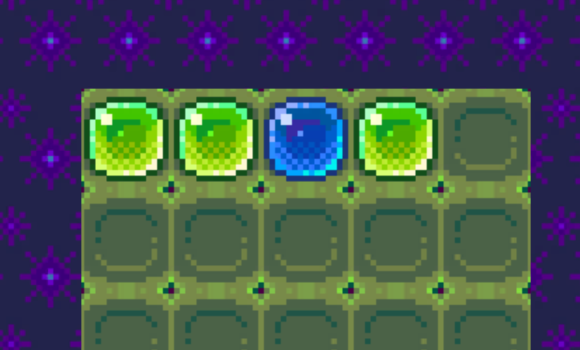
바로 위 코드를 적용하면 오른쪽으로 2개이상 검사를 안하기때문에 위와같은 조합을 찾을수가 없다는것..

그래서 이런식으로 3개일때만 검사를 하게 했다.
L자 모양 찾기
👀 [L모양 조합 찾는 함수]
//L모양 탐색
    public bool FindMatchL()
    {
        List<Puzzle> findPuzzle = new List<Puzzle>();


        for (int j = 0; j < Y; j++)
        {
            for (int i = 0; i < X; i++)
            {
                Puzzle curPuzzle = puzzles[i, j];

                if (curPuzzle == null || curPuzzle.color == PuzzleColor.None) continue;
                if (IsOutOfIndex(i, j + 3)) continue;

                (bool isTrueShape, Puzzle[] puzzleList) result = isLShape(i, j);

                if (result.isTrueShape) // 왼쪽 맨아래 체크
                {
                    findPuzzle.AddRange(result.puzzleList);

                    hintPuzzles.AddRange(findPuzzle);
                    return true;
                }

                result = isReverseLShape(i, j);

                if (result.isTrueShape) // 왼쪽 맨아래 체크
                {
                    findPuzzle.AddRange(result.puzzleList);
                    hintPuzzles.AddRange(findPuzzle);
                    return true;
                }


            }
        }

        //Lshape탐색

        (bool, Puzzle[]) isLShape(int x, int y)
        {
            if (IsOutOfIndex(x + 2, y) || IsOutOfIndex(x, y + 2)) return (false, null);

            Puzzle curpuzzle = puzzles[x, y];

            if (puzzles[x, y + 1].color == curpuzzle.color && puzzles[x, y + 2].color != curpuzzle.color
                && puzzles[x + 1, y + 2].color == curpuzzle.color && puzzles[x + 2, y + 2].color == curpuzzle.color)
            {

                if (!IsOutOfIndex(x - 1, y + 2) && puzzles[x - 1, y + 2].color == curpuzzle.color)
                {
                    return (true, new Puzzle[] { curpuzzle, puzzles[x, y + 1], puzzles[x + 1, y + 2], puzzles[x + 2, y + 2], puzzles[x - 1, y + 2] });
                }
                else if (!IsOutOfIndex(x, y + 3) && puzzles[x, y + 3].color == curpuzzle.color)
                {
                    return (true, new Puzzle[] { curpuzzle, puzzles[x, y + 1], puzzles[x + 1, y + 2], puzzles[x + 2, y + 2], puzzles[x, y + 3] });
                }

            }

            return (false, null);

        }

        //L뒤집은 모양 탐색
        (bool, Puzzle[]) isReverseLShape(int x, int y)
        {
            if (IsOutOfIndex(x - 2, y) || IsOutOfIndex(x, y + 2)) return (false, null);

            Puzzle curpuzzle = puzzles[x, y];

            if (puzzles[x, y + 1].color == curpuzzle.color && puzzles[x, y + 2].color != curpuzzle.color
                && puzzles[x - 1, y + 2].color == curpuzzle.color && puzzles[x - 2, y + 2].color == curpuzzle.color)
            {
                if (!IsOutOfIndex(x + 1, y + 2) && puzzles[x + 1, y + 2].color == curpuzzle.color)
                {
                    return (true, new Puzzle[] { curpuzzle, puzzles[x, y + 1], puzzles[x - 1, y + 2], puzzles[x - 2, y + 2], puzzles[x + 1, y + 2] });
                }
                else if (!IsOutOfIndex(x, y + 3) && puzzles[x, y + 3].color == curpuzzle.color)
                {
                    return (true, new Puzzle[] { curpuzzle, puzzles[x, y + 1], puzzles[x - 1, y + 2], puzzles[x - 2, y + 2], puzzles[x, y + 3] });
                }
            }

            return (false, null);
        }

        return false;
    }
L자는 반복문으로 어떻게 해야할지 각이 안나와서 함수를 따로 만들어두고 검사를했다.
L자와 L자를 뒤집어놓은 경우 2개를 만들어놓고 검사했다.

위 상황이 L자가 되는 상황, 아래 상황이 리버스 L자가 되는 상황이다.
저 배열의 모양대로 색깔을 검사하고, 다른 색깔의 주변만 살피면 된다.
최적화
오브젝트 풀

👀 [오브젝트 풀 클래스]
using System.Collections;
using System.Collections.Generic;
using UnityEngine;
using System;

public class ObjectPool<T> where T : class
{

    Queue<T> pool = new Queue<T>();
    Func<T> creatFunc;
    Action<T> initAction;
    Action<T> returnAction;

    //생성자
    public ObjectPool(int poolSize,Func<T> createFunc, Action<T> InitAction, Action<T> returnAction)
    {
        this.creatFunc = createFunc;
        this.initAction = InitAction;
        this.returnAction = returnAction;

        for ( int i = 0; i < poolSize; i++ )
        {
            pool.Enqueue(createFunc());
        }
    }

    //빌려줄때
    public T BorrowFromPool()
    {
        T newObj = null;

        if (pool.Count.Equals(0))
        {
            newObj = creatFunc();
        }
        else
        {
            newObj = pool.Dequeue();
        }

        initAction(newObj);

        return newObj;
    }

    //되돌려 받을때
    public void ReturnToPool(T returnObj)
    {
        returnAction(returnObj);
        pool.Enqueue(returnObj);
    }


}
오브젝트 풀 클래스를 만들어주고,
가장 많이 생성되는 노말 퍼즐은 오브젝트 풀로 관리를 했다.
생성함수, 빌려줄때, 되돌려 받을때 함수들을 Action과 Func를 통해 만들어놓고 생성자를 통해 받았다.
👀 [퍼즐 오브젝트 풀 함수들]
   #region 오브젝트 풀


    //풀 퍼즐 생성
    public Puzzle MakePoolPuzzle()
    {
        Puzzle newPuzzle = Instantiate(puzzlePrefab[0], puzzleFrame.transform).GetComponent<Puzzle>();
        newPuzzle.gameObject.SetActive(false);

        return newPuzzle;
    }

    //풀 빌려주기 전 실행할 함수
    public void PoolInitAction(Puzzle puzzle)
    {
        puzzle.gameObject.SetActive(true);
    }

    //풀 돌려받을때 실행할 함수
    public void PoolReturnAction(Puzzle puzzle)
    {
        puzzle.gameObject.SetActive(false);
    }


    #endregion
아틀라스
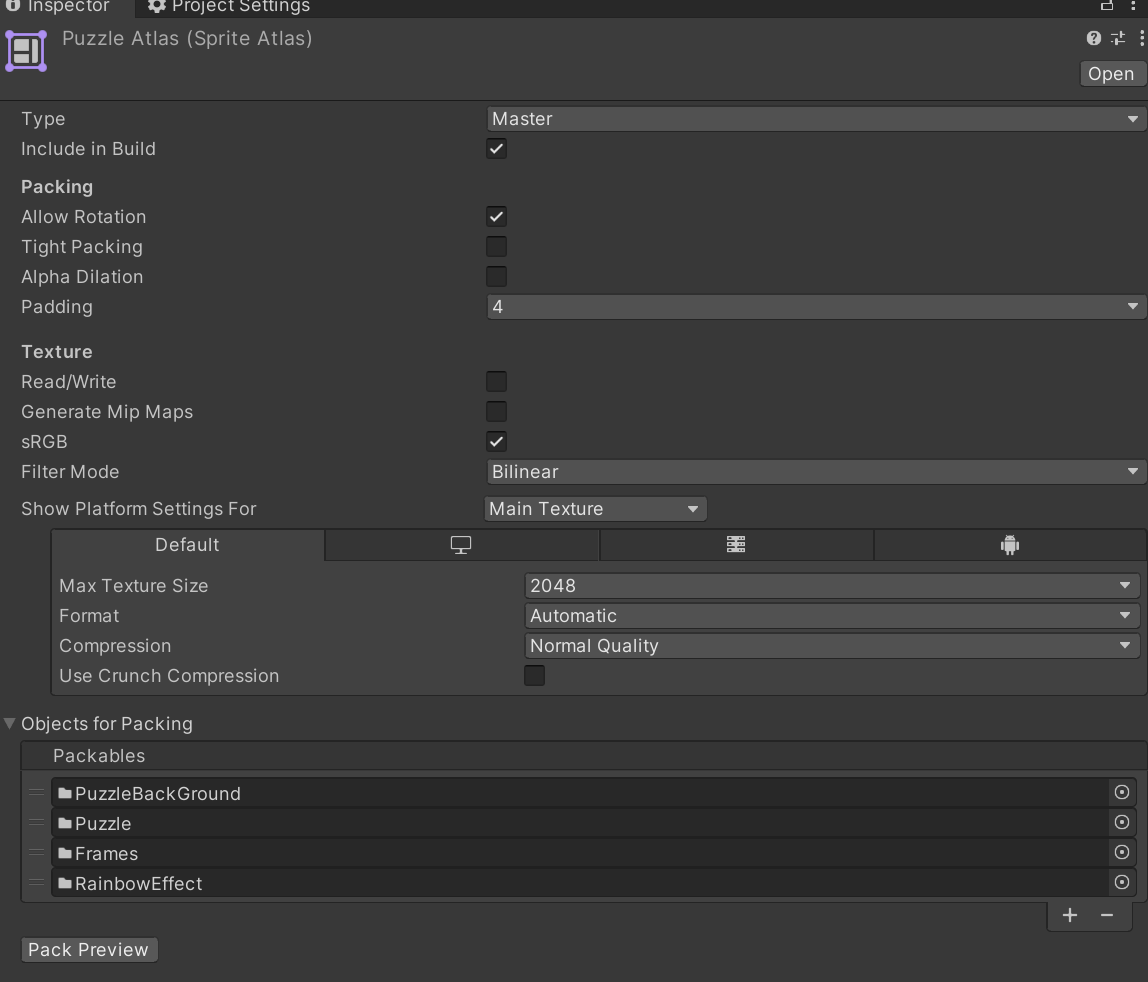
아틀라스를 통해 이미지를 합쳐주었다.
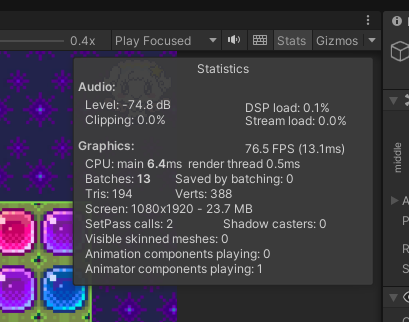

조금이지만 Batches가 줄었다..
정적,동적 캔버스 분리

캔버스 2개를 나눠줌으로써 다시 그릴필요 없는 이미지들까지 그려지는걸 방지했다.

그리고 당연한거지만 클릭이 필요없는 이미지에 Raycast Target을 off시켜주는건 필수 작업이다.
마치며..
이것저것 찾아가며 구현했는데 나름 재밌었다.
특히 매치되는것을 찾고 터트리고, 아이템을 지급하는 코드와
5,4,3,L자가 되는것을 찾아 힌트를 주는 코드는 몇번을 수정해도 만족스럽지가 않았다.
예전에 영상을 보다가 들은 말이지만
나중에 실력을 더 쌓고 이 코드들을 봤을때 많이 허접해보이더라도.. 이 코드는 그때 당시 최선의 코드였을거라고 하는말이 와닿았다.
이 코드는 지금 나한테 있어서는 최선의 코드였다.
많이 부족한 코드지만 궁금하거나 연습용 리소스가 필요하신분들은 깃허브 주소에서 보시면 된다.
https://github.com/AsickAsack/Match3_Puzzle
GitHub - AsickAsack/Match3_Puzzle
Contribute to AsickAsack/Match3_Puzzle development by creating an account on GitHub.
github.com
'개발일지' 카테고리의 다른 글
| [Unity] Match 3 퍼즐 에디터 만들어보기 (0) | 2023.07.20 |
|---|

포스팅이 좋았다면 "좋아요❤️" 또는 "구독👍🏻" 해주세요!
![[Unity] Match 3 퍼즐 에디터 만들어보기](https://img1.daumcdn.net/thumb/R750x0/?scode=mtistory2&fname=https%3A%2F%2Fblog.kakaocdn.net%2Fdna%2FbfE96c%2FbtsonSFbpgk%2FAAAAAAAAAAAAAAAAAAAAAO7TCAbsIioR6d8x5SYCEbTusduCjXz6Oo1JekAtrvB_%2Fimg.gif%3Fcredential%3DyqXZFxpELC7KVnFOS48ylbz2pIh7yKj8%26expires%3D1767193199%26allow_ip%3D%26allow_referer%3D%26signature%3DFZxeRjXfTdJu9UICSaVyhqF0xl0%253D)