![[Unity] Match 3 퍼즐 에디터 만들어보기](https://img1.daumcdn.net/thumb/R750x0/?scode=mtistory2&fname=https%3A%2F%2Fblog.kakaocdn.net%2Fdna%2FbfE96c%2FbtsonSFbpgk%2FAAAAAAAAAAAAAAAAAAAAAO7TCAbsIioR6d8x5SYCEbTusduCjXz6Oo1JekAtrvB_%2Fimg.gif%3Fcredential%3DyqXZFxpELC7KVnFOS48ylbz2pIh7yKj8%26expires%3D1782831599%26allow_ip%3D%26allow_referer%3D%26signature%3DwrRFBPXYO7BCsDv029bOlMGE6Gc%253D)

클래스생성

StageManager라는 클래스를 생성해주고 , 필요한 값이나 이미지 변수들을 만들어 주었다.
커스텀 에디터 작업
초기화
[CustomEditor(typeof(StageManager))]
public class StageManagerEditor : Editor
{
    public SerializedProperty x_property;
    public SerializedProperty y_property;
    public SerializedProperty backGrounds;
    public SerializedProperty prefabs;
    public SerializedProperty normalPuzzleSprites;
    public SerializedProperty horizontalPuzzleSprites;
    public SerializedProperty verticalPuzzleSprites;
    public SerializedProperty gameTheme;

    private int curtogleIndex;
    private Puzzle[,] puzzles;
    private PuzzleType curPuzzleType;

    private void OnEnable()
    {

        x_property = serializedObject.FindProperty("x");
        y_property = serializedObject.FindProperty("y");
        backGrounds = serializedObject.FindProperty("backGrounds");
        prefabs = serializedObject.FindProperty("prefabs");
        normalPuzzleSprites = serializedObject.FindProperty("normalPuzzleSprites");
        horizontalPuzzleSprites = serializedObject.FindProperty("horizontalPuzzleSprites");
        verticalPuzzleSprites = serializedObject.FindProperty("verticalPuzzleSprites");
        gameTheme = serializedObject.FindProperty("gameTheme");

        puzzles = new Puzzle[x_property.intValue, y_property.intValue];
    }
   }
일단 이 파일을 'Editor'폴더에 넣어줘야한다.
Editor폴더는 빌드할때 포함되지 않는다.
using UnityEditor를 해주고, Editor를 상속받아준다.
CustomEditor애트리부트로 StageManager의 커스텀 에디터 스크립트로 만들어준다.
인스펙터에 띄울 변수들을 정의하고, 커스텀에디터가 활성화될때 호출되는 OnEnable 함수에서 직렬화변수들을 참조해주었다.
그리고 마지막으로 x,y값에 맞춰서 puzzle 배열을 생성해줬다.
인스펙터 그리기
public override void OnInspectorGUI()
{
    StageManager myScript = (StageManager)target;

    // 각 프로퍼티들에 대한 기본 ui 필드들을 생성
    EditorGUILayout.PropertyField(x_property);
    EditorGUILayout.PropertyField(y_property);
    EditorGUILayout.PropertyField(backGrounds);
    EditorGUILayout.PropertyField(prefabs);
    EditorGUILayout.PropertyField(normalPuzzleSprites);
    EditorGUILayout.PropertyField(horizontalPuzzleSprites);
    EditorGUILayout.PropertyField(verticalPuzzleSprites);
    EditorGUILayout.PropertyField(gameTheme);
}
OnInspectorGUI는 인스펙터가 그려질때 호출된다.
DrawDefaultInspector()로 기본 인스펙터처럼 그릴수있지만,
커스텀에디터의 기능을 활용하기 위해서는 위와같이 하나씩 그려주어야 한다.
퍼즐 배경 만들기
우리는 play를 누르지않고 에디터 상태에서 작업을 할거기 때문에, x,y값에 변화가 생기면 감지하고 크기에맞게 생성을 시켜주어야 한다.
public override void OnInspectorGUI()
{

    StageManager myScript = (StageManager)target;

	EditorGUI.BeginChangeCheck();

    EditorGUILayout.PropertyField(x_property);
    EditorGUILayout.PropertyField(y_property);
    EditorGUILayout.PropertyField(backGrounds);
    EditorGUILayout.PropertyField(prefabs);
    EditorGUILayout.PropertyField(normalPuzzleSprites);
    EditorGUILayout.PropertyField(horizontalPuzzleSprites);
    EditorGUILayout.PropertyField(verticalPuzzleSprites);
    EditorGUILayout.PropertyField(gameTheme);


    if (EditorGUI.EndChangeCheck())
    {

        if (x_property.intValue != ((StageManager)target).x || y_property.intValue != ((StageManager)target).y)
        {
            puzzles = new Puzzle[x_property.intValue, y_property.intValue];
            serializedObject.ApplyModifiedProperties();

            myScript.MakeFrames();
            DestoryAllPuzzles();
        }
    }
}
EditorGUI.BeginChangeCheck() 함수를 통해 변화가 있는지 체크를 시작,
EndChangeCheck()를 통해 변화가 있는지 확인한다.
변화가 x,y값에 있다면 퍼즐 배열을 새로 생성하고, 변화를 게임오브젝트에 적용해준다.
퍼즐 배경을 새로 생성하고, 퍼즐들이 있다면 지워준다.
 //프레임 생성
    public void MakeFrames()
    {
        Transform frame = GameObject.Find("Frame").transform;
        frame.GetComponent<RectTransform>().sizeDelta = new Vector2((puzzleSize.x * x) + puzzleSpacing, (puzzleSize.y * y) + puzzleSpacing);

        foreach (GameObject g in backList)
        {
            DestroyImmediate(g.gameObject);
        }

        backList.Clear();

        //퍼즐 배경 생성
        for (int i = 0; i < x; i++)
        {
            for (int j = 0; j < y; j++)
            {
                backList.Add(Instantiate(backGrounds, frame));
                backList[^1].GetComponent<PuzzleBackGround>().Init(GetPos(i, j), backGrounds.GetComponent<Image>().sprite);
            }
        }
    }
이 함수는 StageManager에 있는 함수인데, 배경을 다 지우고 새로 그리는 함수다.

배경이 알맞게 잘 수정된다.
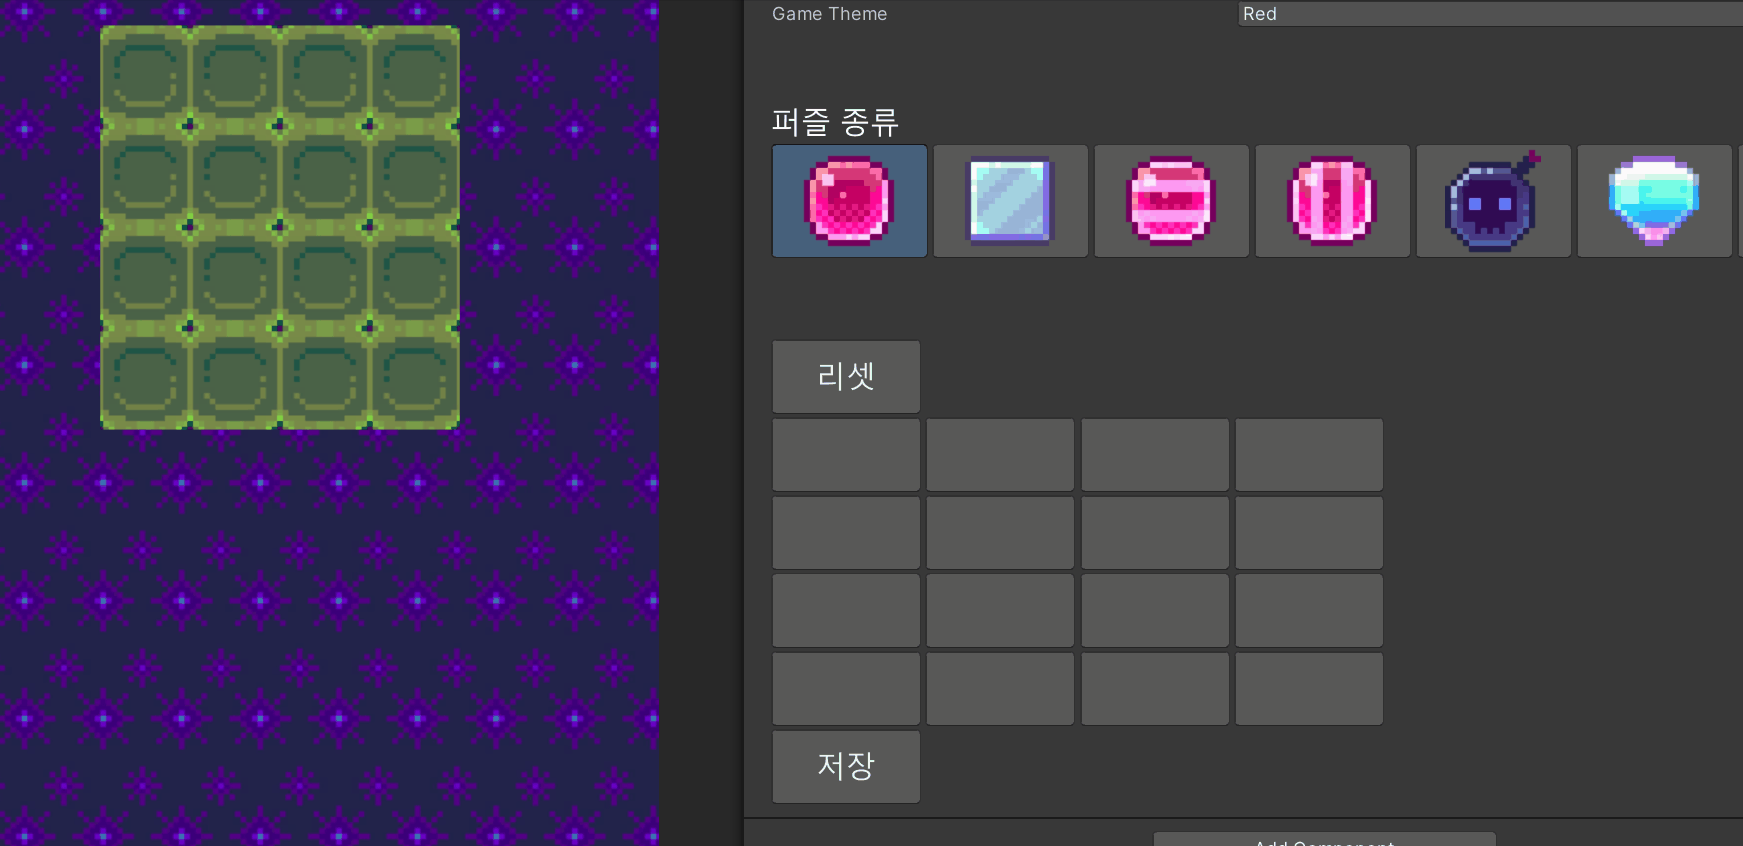
아이템 그리드 만들기
 public override void OnInspectorGUI()
 {

 //다른 코드 생략

     List<Texture> textures = new List<Texture>();

    for (int i = 0; i < myScript.prefabs.Length; i++)
    {
        textures.Add(GetTexture(i,gameTheme.enumValueIndex,myScript));
    }
    textures.Add(null);

    curtogleIndex = GUILayout.SelectionGrid(curtogleIndex, textures.ToArray(), 7);
    SetCurPuzzleType();
    EditorGUILayout.Space(50);

    //다른 코드 생략
 }


//아이템 텍스쳐 Get함수
public Texture GetTexture(int index,int color,StageManager manager)
{
    try
    {
        switch (index)
        {
            //노말
            case 0:
                return manager.normalPuzzleSprites[color].texture;
            //장애물
            case 1:
                return manager.prefabs[index].GetComponent<Image>().sprite.texture;
            //가로
            case 2:
                return manager.horizontalPuzzleSprites[color].texture;
            //세로
            case 3:
                return manager.verticalPuzzleSprites[color].texture;
            //폭탄
            case 4:
            //다이아
            case 5:
                return manager.prefabs[index].GetComponent<Image>().sprite.texture;
            case 6:
                return null;
        }
    }
    catch
    {
        return null;
    }

    return null;
}
OnInspectorGUI에서 Grid를 그려준다.
원래는 토글로 먼저 진행했었는데, 토글 그룹처럼 한개만 누르는게 까다로워서 스택오버플로우에서 그리드를 사용하라는 글을 보고 바꿨다.
curGridIndex = GUILayout.SelectionGrid(curGridIndex, textures.ToArray(), 7);GUILayout.SelectionGrid 는 int변수와 텍스쳐 배열 변수, 그리고 컬럼수를 매개변수로 받는다.
다른 매개변수를 가진 함수들도 오버로드 되어있으니 직접 확인해보셔도 좋다.
curGridIndex에는 현재 눌린 그리드값을 리턴받는다.
    //현재 눌린 타입 세팅
    public void SetCurPuzzleType()
    {
        curPuzzleType = (PuzzleType)curGridIndex;
    }
리턴 받고나서 바로 현재 눌려있는 퍼즐 타입을 세팅해준다.

이런식으로 생성이 됐다.
textures.Add(GetTexture(i,gameTheme.enumValueIndex,myScript));그리고 내가 아까 텍스쳐를 주가할때 게임 테마(색깔)를 넣었다.
그래서 게임 테마의 enum값이 바뀔때마다 색깔이 있는 퍼즐들의 색도 바뀐다.

배열 버튼 만들기
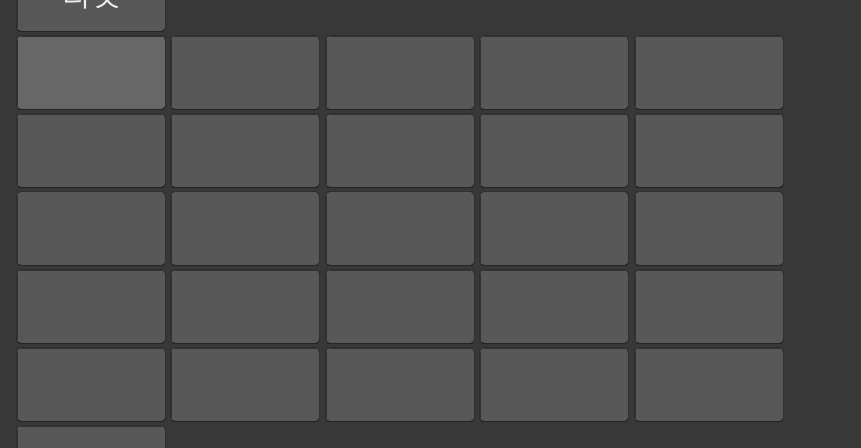
퍼즐 배열의 수만큼 버튼을 만들어서 퍼즐을 버튼으로 눌러서 생성되게 작업했다.
아래 코드는 인스펙터에서 변경 적용이 된 이후에 실행해야 한다.
        // 버튼 그리드 시작

        for (int y = 0; y < y_property.intValue; y++)
        {
            EditorGUILayout.BeginHorizontal();

            for (int x = 0; x < x_property.intValue; x++)
            {
                Texture tempTexture = null;

                if (puzzles[x, y] != null)
                {
                    tempTexture = puzzles[x, y].GetComponent<Image>().sprite.texture;
                }

                if (GUILayout.Button(image: tempTexture, style: btnStyle))
                {
                    if(tempTexture != null)
                    {
                        DestroyImmediate(puzzles[x, y].gameObject);
                    }

                    puzzles[x, y] = myScript.MakeNewPuzzleInGame(x, y, curPuzzleType,(PuzzleColor)gameTheme.enumValueIndex);
                }
            }
            EditorGUILayout.EndHorizontal();
        }
y값을 첫번째 포문으로 두어서 왼쪽 위부터 만들게 한다.
BeginHorizontal()과 EndHoriznotal로 가로로 쭉 생성되게 할 수 있다.
즉 y값이 (세로) 하나 넘어갈때마다 한칸 내려가서 생성하게 하는것이다.
버튼은 GUILayout.Button()으로 생성하는데, 이 함수도 오버로드 되어서 많은 매개변수의 조합들이 있다.
나는 라벨은 필요없어서 텍스쳐와 GUIStyle을 넣어주었다.
        GUIStyle btnStyle = new GUIStyle(GUI.skin.button);
        btnStyle.fontSize = 20;
        btnStyle.fixedHeight = 50;
        btnStyle.fixedWidth = 100;
GUIStyle은 GUI의 모양이나 폰트, 사이즈와 같은 부분들을 수정하게 해준다.
모양의 사이즈와 폰트 사이즈를 정하고, 해당 퍼즐이 null이 아니라면 텍스쳐를 가져와서 버튼에 적용시켜 주었다.
그리고 UILayout.Button()은 bool값을 반환하는데,
눌렸을때 True가 반환되므로 if문안에는 눌렸을때 해야할 작업을 넣어주면된다.
난 실제 게임씬에 현재 퍼즐타입(그리드눌러서 세팅한)의 퍼즐이 생성되게 해주었다.
저장하기
 //저장 함수
    public void Save()
    {
        StringBuilder saveString = new StringBuilder();

        saveString.Append(gameTheme.enumValueIndex+"\n");
        saveString.Append(x_property.intValue + "/" + y_property.intValue);

        for (int y = 0; y < y_property.intValue; y++)
        {
            saveString.Append("\n");
            for (int x = 0; x < x_property.intValue; x++)
            {
                if (puzzles[x, y] == null)
                {
                    Debug.LogError("빈 공간이 있습니다.");
                    return;
                }
                else
                {

                    saveString.Append(((int)puzzles[x, y].type).ToString() + ((int)puzzles[x, y].color).ToString());
                }

                if (x != x_property.intValue - 1)
                    saveString.Append("/");
            }
        }

        File.WriteAllText(Application.dataPath+"puzzleData.txt", saveString.ToString());

        Debug.Log("저장이 완료됐습니다!");
    }
첫번째 줄에는 게임테마
두번째 줄에는 x/y
세번째 줄부터는 퍼즐을 순회하며 퍼즐타입과 색을 넣어주었다.
string을 합칠때는 stringBuilder를 사용했다.
저장은 그냥 편하게 txt로 했다.
적용하기

다시 인게임으로 돌아와서, Puzzle Data(Text Asset) 변수에 해당 파일을 집어넣어 주었다.
  //데이터 세팅
        if(puzzleData != null )
        {
            string[] data = puzzleData.text.Split("\n");

            gameTheme = (PuzzleColor)int.Parse(data[0]);
            this.x = int.Parse(data[1].Split("/")[0]);
            this.y = int.Parse(data[1].Split("/")[1]);

            manager.InitPuzzles(x, y);
            puzzlePool = new ObjectPool<Puzzle>(x * y, MakePoolPuzzle, PoolInitAction, PoolReturnAction);

            for (int j = 0; j < y; j++)
            {
                string[] puzzleData = data[j+2].Split("/");

                for (int i = 0; i < x; i++)
                {
                    manager.SetPuzzle(i, j, MakeNewPuzzle(i, j, (PuzzleType)int.Parse(puzzleData[i][0].ToString()), (PuzzleColor)int.Parse(puzzleData[i][1].ToString())));

                }
            }
        }
가져온 데이터들로 게임 테마와 x,y값들을 설정하고 퍼즐배열을 순회하며 생성을 해주었다.

아마 마지막으로 누른 퍼즐이 블루라서 색도 블루테마로 바뀐거같다..
사실 에디터에서 버튼을 눌렀을때 게임씬까지 오브젝트를 생성해서 보여줄필요는 없는거같긴 한데 ..
이것저것 구현해볼수 있어서 재밌었다.
https://github.com/AsickAsack/Match3_Puzzle
GitHub - AsickAsack/Match3_Puzzle
Contribute to AsickAsack/Match3_Puzzle development by creating an account on GitHub.
github.com
'개발일지' 카테고리의 다른 글
| [Unity] Match 3 퍼즐 만들어보기 (0) | 2023.07.20 |
|---|
포스팅이 좋았다면 "좋아요❤️" 또는 "구독👍🏻" 해주세요!
![[Unity] Match 3 퍼즐 만들어보기](https://img1.daumcdn.net/thumb/R750x0/?scode=mtistory2&fname=https%3A%2F%2Fblog.kakaocdn.net%2Fdna%2FbLX0Cr%2FbtsooKflfSz%2FAAAAAAAAAAAAAAAAAAAAAG859YvT2sk_6-xwqKNglvH43BqYkdeL58jnwHOQow8G%2Fimg.gif%3Fcredential%3DyqXZFxpELC7KVnFOS48ylbz2pIh7yKj8%26expires%3D1782831599%26allow_ip%3D%26allow_referer%3D%26signature%3DksdhxnLyp1rWc3NGkQRoKBfgj%252FA%253D)